Wednesday, May 21, 2014
Green Eggs and Ham Breakfast for Dinner!


There are only three chapters in this book, you go straight into the Main Dishes after a page of introduction and a double page about ingredients called Getting Started. Many of the recipes also have variations listed as More to try.
Main Dishes includes: Steak Eggs Benedict, Italian Style Stuffed French Toast, Egg & Chorizo Burritos, Cornflake-Crusted Tenders, Huevos Rancheros Tacos, Green Pea Carbonara, Savoury Lentil and Carrot Stuffed Crepes, Polenta Cakes with Shitake Mushrooms, Pizza Over Easy and those gorgeous Sunny-Side-Up Burgers.
Sides and Starters includes: Maple-Glazed Pork Meatballs, Root Vegetable Latkes, Bacon Jam (I am definitely going to make this), Habanero-Cheddar Bread Pudding, Espresso Baked Beans, Mini Zucchini and Pesto Quiches and Bloody Mary Tomato Soup.
Drinks and Desserts includes: Maple Bacon Cupcakes, Mocha Ice Cream Pie with Biscotti Crust, Blood Orange Mimosa Sorbet, Frozen Sunrise Margaritas, Granola Cookies, Chocolate Brownie Waffles with Blackberry Sauce, Earl Grey Panna Cotta, Doughnut Fudge Sundaes and Mint Choc Chip Pancakes.
This is not an exhaustive list of the recipes just the ones that jumped out at me.
Who is it for? Most people would find something in this book that they enjoy, on the whole if you like cooking and eating comfort food, youll enjoy the recipes in Breakfast for Dinner.
Pros
- The book is clearly laid out with excellent photographs and there is almost every recipe.
- There are some step-by-step photo tutorials e.g. Perfectly Poached Eggs, How to Make Ravioli.
- Bacon does seem to feature quite prominently in this book but there are a number of excellent non-meat recipes too.
- Although this book is originally published in the USA, there is an excellent Metric Conversion Chart at the back.
- Lindsay Landis and Taylor Hackbarth also have their own website/blog Love and Olive Oil
Cons
- There are some healthy recipes but on the whole, breakfasting like a King at dinner time is for treats rather than every day!
- Most of the main dishes and desserts appealed to me but not so sure about some of the sides and drinks, okay for entertaining but not something I would make regularly.
Green Pea Carbonara
Makes 4 servings
Time 40 minutes
1 1/2 cups frozen peas, thawed
1 large egg*
2 large egg yolks
1 oz (1/4 cup) Parmesan cheese, grated plus more for serving
1/4 cup heavy (double) cream
1/4 tsp salt
1/2 tsp freshly ground black pepper
4 oz pancetta or bacon, cubed
1 medium onion, chopped
1 pound rigatoni (I used half this amount of pasta as I would normally allow 2oz per person)
1. In a blender or food processor, blend peas, egg, egg yolks, cheese and cream on high speed until smooth, about 30 seconds. Add salt and pepper.


2. In a large skillet over medium heat, cook pancetta until browned, 6 to 8 minutes (if using bacon, cook for slightly longer or until beginning to crisp then drain excess fat from pan). Add onions and cook until softened, another 5 minutes.
3. Cook pasta according to package direction until just tender and still firm to the bite. Drain, reserving 1/2 cup of the pasta water. Add pasta to skillet and toss with onions and pancetta for 1 to 2 minutes. Remove skillet from heat, stir in pea mixture, working swiftly and vigorously so egg does not scramble. If sauce is too thick, mix in reserved pasta water, a little at a time. Transfer to serving bowls and top with more Parmesan Cheese. Serve.

*Do note that the eggs in this recipe are not fully cooked; we recommend using farm-fresh eggs from a trusted source. Or buy parteurised eggs if you are worried about bacteria.
I made this recipe on my return from the Marmalade Awards, it was quick and easy to make, tasted delicious and my mother-in-law commented that it was different! She will generally eat whatever I put in front of her, I think it was a compliment, perhaps the colour was not what she was expecting.
Breakfast for Dinner
Lindsay Landis and Taylor Hackbarth
Published by Quirk Books, distributed in UK by PGUK
RRP: £12.99
Online bookstore: £8.96
Previously reviewed books by this author: The Cookie Dough Lovers Cookbook by Lindsay Landis
Jan at A Glug of Oil is running a giveaway, so if you fancy your chances of winning a copy of Breakfast for Dinner, hop over to her site and enter.
I received a copy of Breakfast for Dinner to review, I was not paid for this review and all opinions are my own.
Saturday, May 3, 2014
Carrot and Tomato Soup Credit Crunch Munch

Carrot and Tomato Soup (serves 8)
1 tbsp sunflower oil (2p)
1 large onion, peeled and roughly chopped (19p)
Approx 600g carrots, peeled and roughly chopped (40p)
2 cans plum tomatoes chopped or unchopped doesnt matter (31p)
1 litre vegetable stock (2p)
salt and freshly ground pepper
200ml milk optional (15p)
1. Heat the oil in a large pan (I make this in my pressure cooker but its not essential) add the onion and the carrots and stir them around for a few minutes.
2. Add the two tins of tomatoes and the stock.
3. Season with a tsp salt and a few grinds of pepper, you can adjust later if required.
4. Cook until the carrots are soft, 10 minutes in the pressure cooker, about 20 minutes without.
5. Puree the soup either with a stick blender straight into the pot or using a blender or food processor.
6. Add the milk if using, but the soup is also very good without it.
Total Cost: £1.09
Printable Recipe

Sunday, April 27, 2014
Rhubarb and Ginger Zinger!


I thought about making the schnapps, but somehow it was the Homemade Rhubarb Syrup that appealed to me. The recipe is just sooooo easy: two cups sugar, two cups water, 6 or 7 stalks of rhubarb, washed trimmed and finely sliced. Check out the method, also extremely easy, at The Paupered Chef. I sterilised a jar and have been storing the glorious pink stuff in the fridge waiting for the weekend to come around again.

Rhubarb and Ginger Zinger
250ml Rhubarb Syrup
1 small orange
bottle of Crabbies Alcoholic Ginger Beer or a bottle of non-alcoholic ginger beer

1 slim stick of rhubarb
1 strawberry
some mint
cocktail stick or skewer
1. Cut the orange in half, squeeze one half and put the juice in the bottom of a tall glass. Cut a slice from the other half of the orange and make a cut into it so it will sit on the glass.
2. Take the stalk of rhubarb, split the top downwards with a knife several times until it starts to splay out, put it cut side down into a glass of iced water (this will help it to bend)
3. Pour 250ml Rhubarb Syrup into the glass
4. Top up with Crabbies AGB or, for a non-alcoholic cocktail, ordinary ginger beer.
5. Remove the rhubarb stick from the water, dry with kitchen paper and place with the flower upwards into the glass.
6.Thread the strawberry and mint onto the cocktail stick or skewer (I used a bbq skewer and cut it to size) and lay across the top of the glass
7. Add the slice of orange and enjoy.
The rhubarb can be used to mix the ingredients before drinking, but its fun to leave the layers of different ingredients showing when you serve.


Thursday, April 17, 2014
Beef Guinness Stew – Drinking AND Eating Beer on St Patricks Day

Monday, April 14, 2014
Im About to Make Like a Pea and Split… To Vegas Baby!
 Im feverishly working to wrap things up before I travel to Las Vegas on Thursday for an About.com guide event. They used to call these things "conventions," but when that term became associated with drunken debauchery, they started using euphemisms like, "Team Building," "Corporate Retreat," and "Company Conference." Also, theyre not strippers, they are exotic dancers.
 As usual, I will try to photo, film, and write about my adventures for the blog. The beautiful Bellagio hotel pictured here is where I will NOT be staying. I was given a tip to check out some hotels off the strip, which, due to the current economic conditions, were offering some amazing bargains. I found a room for 5 days that is going to cost less...in total...than 1/2 a room for one night at the Bellagio! I will withhold the name of this high-end establishment until I see it firsthand. Wish me luck.
Speaking of Split Peas - I will be uploading a killer Split Pea Soup video recipe. I made it last night, and it was super good. Stay tuned!
Vegas Photo (c) Flickr user jimg944
Sunday, April 13, 2014
POTATO CHOPS PEPPER MINCE AND POTATO CUTLETS

Friday, April 11, 2014
Ham and Parsley Puff Pie


Thursday, April 10, 2014
Beef Short Ribs Braised with Wild Mushrooms and Tomato – I Sure Hope Youre Having Bad Weather
 This video recipe for beef short ribs braised with porcini mushrooms and tomato is so comforting, so satisfying, and so deeply warming that when I make it, Im actually disappointed if its not storming outside.
I mean, why waste a dish like this on a nice day? I havent quite mastered controlling the weather yet (although, from what I hear, many of my old habits have raised the globes temperature a little), but this time of year you can usually count on Mother Nature blessing you with some cold, wet weather in which to enjoy these ribs.
The short ribs are slowly braised with easy-to-find dried porcini mushrooms (for real, ask someone at the fancy grocery store and theyll find them for you!) until they turn into a triumph of fork-tender goodness.
I love these short ribs over mashed potatoes, but the rich tomato and mushroom gravy is fantastic over soft polenta as well. I really hope you give this cool weather wonder a try. Enjoy!
Ingredients:
1/2 cup dried porcini mushroom
1/2 cup water
2 1/2 to 3 pounds beef short ribs (about 8-10 pieces)
salt and freshly ground black pepper to taste
2 tbsp vegetable oil
1 onion, sliced
2 cloves garlic, minced
2 cups beef broth
1 cup tomato sauce
1/2 tsp salt
pinch of cayenne
1 bay leaf
1 tsp dried rosemary
Tuesday, April 8, 2014
Perfect recipe for cooler days beef and pork Stuffed Cabbage of rolls
As we head in the automatically enjoy the delicious food I think autumn, but not on hot days make conjures up. Its just something about 100 + degree days, which makes you want to make quick meals. But the cooler days arrived, I love brings I my cooler (note you I not say call, cool or cold) days see recipe This cabbage rolls are one of them. The combination of beef and pork make rolling the special. Try comfort soon for a real old fashion meal.
RIND-AND PORK STUFFED CABBAGE ROLLS
1 medium to large head of cabbage
1 lb lean beef
1 lb. lean ground pork
3/4 Cup rice, uncooked
2 small onions or 1 medium onion, chopped
Salt to taste
Pepper to the taste
1 El dill
1/2 Pint sour cream
3 TBSP flour
1 small can tomato paste
1 Teaspoon salt
2 TBSP sugar *.
Remove the core of the cabbage; Place the cabbage in a large saucepan with boiling water. Parboil Kohl, the leaves out one at a time can Shell to you. Place the leaves on a paper towel or clean towel to drain.
Mix the minced beef, ground pork, rice, onions, salt and pepper. Placing some of the mixture on each of the enough the leaves leaving Savoy cabbage, herb leaf, it rolls over the mixture, cover mode; secure with toothpicks.
Place the cabbage rolls in a large pan and boiling water. Add the dill to the water and bring the water back to the boil. Cook roles for 1 hour. Remove roles from the pan with a skimmer. Stir sour cream, flour, tomato paste, 1 TEASPOON salt and sugar in a medium-sized bowl together. So is this mixture in the Pan, from which you removed the cabbage rolls. After the mixture in is well mixed, add the cabbage for about 10 minutes to the Pan and heat rolled back.
Diabetics can enjoy this recipe by replacing sugar with 2 tablespoons SPLENDA Granular.
Enjoy!
Visit her blog at http://grandmasvintagerecipes.for more of Lindas old fashion recipe collection
Visit for more of their recipes and diabetic information http://diabeticenjoyingfood.squarespace.com
Yogurt and Heavy cream Rice Daddojanam curd rice
Addition of cream to this rice gives more lovely flavor and yummy taste.

Yogurt/curd-3cups
Heavy cream(Non-fat)-1/2cup
Cooked rice-2cups(cook rice by adding 1 and 1/2 cup of water for 1cup of rice)
Green chili-2 finely chopped
onion finely chopped-1/4cup
Salt to taste
Oil-2tbsp
mustard seeds-1/2tbsp
cumin seeds-1/2tbsp
curry leaf-1 rid(optional)
red chili-1
Method
Mix yogurt, cream, rice, onion, salt and green chili in a medium size bowl. Heat oil in a pan and add mustard seeds and cumin seeds when they splatter add curry leaf and red chili. Add this tempering to curd rice and mix well. Now the yummy Daddojanam is ready to serve. Hope you like my recipe.

Friday, April 4, 2014
Lambage Rolls! Lamb Rice Stuffed Cabbage Leaves with Almonds and Currants

I love lamb burgers and lamb meatballs, so it’s no surprise that I love lamb-stuffed cabbage rolls, and I’m happy to report that these particular “lambage” rolls were the best non-beef version yet!

4 cloves garlic, crushed
View the complete recipe
Thiruvadirai Kali and Thalagam

Kali and thalagam are a unique combination in Tamil Brahmin cuisine. Kali is a kind of jaggery sweetened upma and thalagam is a kind of sambhar made specially on this day of the year. Generally sambars are always had with rice or tiffin items like idlis and dosais. It is quite unusual that here a savoury thalagam is made to pair with the sweet Kali, something that brings to my mind the cliched phrase Opposites Attract
The web portal Kerala Iyers gives a description about the Thiruvadirai ( Thiruvatharai / Thiruvadarai ) festival.
The celebration of this festival by Kerala Iyers is a mixture of the practice of Tamil Nadu and Kerala. Early morning after the bath everybody tries to visit a Shiva temple. Afterwards Kali a sweet made of Jaggery and fried rice powder is prepared. As a side dish (Kari) a very special preparation made out of Kavittu (Dioscorea yam), pumpkin and Averaikai (lab lab beans) is made. This is the only occasion when a salty side dish is prepared for a sweet. In Kerala homes Kali is made out of Arrowroot powder and Jaggery. In Tamil Iyer homes the side dish is similar to the usual Sambhar with large number of vegetables. They insist that a few of these vegetables must be tubers and a few born on tendrils. They call this preparation Thalagam. The chanting of Thiruvembavai common in Tamil Nadu is not observed in Kerala. In the afternoons swings made of split bamboo are hung in trees and all the children enjoy the swift swing. This practice is absent in Tamil Nadu.
Though we are not Kerala Iyers, my mothers family make thalagam as per the description above. Fresh winter vegetables like red carrots and Haricot beans along with red pumpkin, colocassia tubers, sweet potatoes and even plantains are cut into large chunks, cooked till soft and simmered in a freshly ground gravy - consisting of mainly red chillies, sesame seeds, coconut and a bit of rice and udad dal. Tamarind is used to give the tanginess and a bit of jaggery to balance it all out. The result is a thick vegetable stew, without the use of any cooked lentils for thickening as is always the case in sambar.
I have blogged about thalagam before, but I guess I have a more accurate recipe here, using the right kind of vegetables.
Thiruvadirai Kali
A traditional sweet rice and lentil preparation
The prepared recipe serves 4-5 people
To prepare the base
2 cups raw rice, washed several times in water, drained and dried off for an hour on a muslin cloth
3/4 cup moong dal (green gram dal, dehusked and split)
In a wok, place the rice and stir around on medium flame till it turns golden. This can take from 10-15 minutes.
After this is done, in the same wok, place the lentils and saute them till they are golden brown too.
Remove both onto a large dish and cool off.
Once cooled, grind in a mixer till you get a coarse powder.
To prepare Kali
1 cup of prepared base powder
1 cup jaggery crushed
2 1/2 to 3 cups water
1/4 cup fresh scraped coconut
Directions
1.In a wok, place 2 1/2 cups water to boil, along with the coconut scrapings. Once it is ready to boil, add in the crushed jaggery and stir till melted.
2. After the jaggery has melted, slowly add the prepared base powder to this on a medium flame with constant stirring so that no lumps are formed.
3. Keep stirring this until all the water has been absorbed and it the consistency of upma. If it is too dry, you can gradually add upto 1/2 more cup of water during the process.
4. Once this is done, remove the entire contents of the wok into a vessel that will go into your steamer or pressure cooker. Steam for 10 minutes (if in cooker, remember not to place the weight).
5. Serve hot with some melted ghee as it is or with thalagam.

Thalagam
Spicy thick vegetable stew made on festive occasion - Thiruvadirai
Generously serves 6 people
Vegetables required and preparation
1 large or 2 medium carrots, peeled and sliced into 3/4" thick pieces
1 plantain, peeled and sliced into 3/4" thick pieces (kaccha kela / vazhaikkai)
6-8 small colocassia tubers (arbi / seppankizhanku)
1 medium sweet potato (ratthalu / seenikizhangu)
1/2 cup large dices of red pumpkin
10-15 haricot beans - stringed and snapped into half ( paapdi / avarakkai)
Peel the colocassia and sweet potato. If the colocassia are very small, then leave them as it is. Cut the sweet potatoes similar in size to the carrots and plantains.
Pressure cook the veggies in 2 cups water, with a pinch of turmeric and 1/2 tsp of salt for 5 minutes. (After the first whistle, reduce the flame to SIM and pressure cook for 5 minutes)
Tamarind extract
Soak 2 packed tablespoons of tamarind in water for 15 minutes OR Microwave this for a minute and keep aside to cool. Squeeze the tamarind to prepare a concentrated extract. Keep aside.
Preparing the spice paste
1/2 cup freshly scraped coconut
2 tbsp white sesame seeds
5 red chillies
1 tsp mustard seeds
1 heaped tbsp udad dal
1 tbsp raw rice
1/4 tsp fenugreek seeds
Directions
1. In a small kadai / saucepan, heat a tsp of oil. To this, add the coconut scrapings and stir for 5-7 minutes, till it turns very fragrant and slightly golden. Remove onto a dish to cool.
2. Next, place the sesame seeds in the saucepan, and saute till they turn golden and start crackling. Takes about 30 seconds to a minute. Remove onto the dish with the sauteed coconut and let cool.
3. Heat a tsp of oil in the same pan, add the mustard and fenugreek seeds. Once mustard seeds splutter, add the red chillies, raw rice, udad dal and saute till the rice and dal turn golden brown. Remove from flame and let cool.
Take all the above and grind to a very fine paste in a mixer adding up to a cup of water. Keep aside.
Final assembly
In a large pan, transfer the pressure cooked veggies with the residual water. To this add the tamarind extract, the ground spice paste. Stir well to mix and bring to a simmer. Add a tsp of salt (or to taste) and a small piece of jaggery. Add some more water if you want to thin out the consistency. Check for salt and serve hot with kali or plain steamed rice. Dont forget to fry some appalams (Tamil papads)
Thursday, April 3, 2014
Grilled Chicken and Salad


Youre a Viewer and Have a Choice Please Vote for Chef John in the Tasty Awards!
 One problem Ive always wanted is not being able to keep track of which online awards Im up for, and which contests I should be asking people to vote in. Well, my wish has come true.
As many of you may know, I was nominated for a 2011 Tasty Award in the "Home Chef in a Series" category, but I forgot to inform everyone that there is also a Viewers Choice Award, which quite frankly is my best shot at heading down to Hollywood and taking home a trophy. So, if you would like to help make my Tasty dreams come true, please click here to vote! Its the fifth category. Thank you so much!
New England Clam Chowder and To Shell or Not to Shell
 New England clam chowder has been a popular food wish over the years, and I finally got around to filming it last January. The problem was I filmed it as an assignment for About.com, which means I have no control over when it airs. Sometimes it only takes a few days, and sometimes, like in this case, it takes many months.
Anyway, thanks for your patience, which I hope youll feel has been rewarded. This is my take on a fairly traditional New England clam chowder, which is probably lighter in texture than you are used to.
My contacts deep inside the authentic clam chowder underground (ACCU) dont agree on much, but most do say "real" clam chowder is nothing like that thick, gray pudding served on Friday at your friendly neighborhood restaurant chain. Ive also had "classic" chowders that were very thin, almost watery. I think this is a happy medium.
Above and beyond the recipe, Id love to open up a discussion on whether this soup should be served with the shells or not. When I posted the written recipe back in January, a friend of mine, Tamar (who publishes the always entertaining blog, Starving Off the Land), left this comment…
"Okay, John, I think its high time we had the shells-in-food debate. Your recipe looks fabulous, of course, as all your recipes do (dont get me started on the Boston cream pie), but Ive always had a problem with shells in my food. Its hard, when youre sitting at the dinner table, to get the shellfish out when the shells are hot and covered with soup, or Bouillabaisse, or marinara sauce, and still be elegant and refined. (And you know how concerned I am with elegance and refinement.)
You seem to have a sophisticated, food-oriented readership. Perhaps you should ask them to weigh in. This is a debate whose time has come."
 So, what do you think? Im a firm believer in serving the soup with the shells, but I shall save my official argument for the comments section. I hope you enjoy the soup and the debate!
Note: Since this video is hosted on About.com, when you click the player, you will be taken off the blog to the video page. For the ingredients, click here to see the original post.
Clams Photo (c) starvingofftheland.com

Wednesday, April 2, 2014
Stovetop Sous Vide Episode 2 NY Strip Steaks – Pretty and Pink
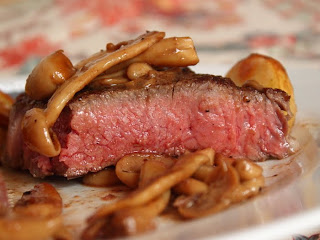 The duck breast we did in Episode 1 of our stovetop sous vide series last month was so spectacular, I couldnt wait to give it a try with some nice thick steaks. I had no doubt that it would work (thanks to the laws of physics), but would the extra time and attention be worth the payoff?
Well, that depends. As far as the taste and texture of the meat goes, it was pretty much the same as any perfectly cooked steak Ive ever had. Not to sound all braggy, but thanks to having done thousands of them, I can produce a pretty decent, medium-rare NY Strip steak in about 15 minutes.
It will be nicely browned and crusty outside, warm and pink in the middle. So for me personally, Im not sure the extra wait is worth it purely for the textural advantages is provides. Dont get me wrong, the results were fabulous, but do I really need to wait 2 1/2 hours to get my beef on?
 The real advantage to this technique is not a superior-quality final product (like it was for the duck), but the fact that youre guaranteeing a perfect medium-rare (using 130 degrees F. water, or 140 for medium, or 150 for medium-well, etc.). So, if youve never had any luck getting large, expensive hunks of steak cooked to your idea of perfection, then this is the way to go, for sure.
Since we went over the basics of this procedure in the previous post, I wont rewrite all the background info about what sous vide is, and how it works. For that kind of scintillating background information, please check out, "Episode 1: The Best Duck Breast Ever." Enjoy!
NOTE: For LOTS more information about doing sous vide steaks, check out Sous-Vide 101: Prime Steak Primer by J. Kenji Lopez-Alt, posted on Serious Eats.
Ingredients for Stovetop "Sous Vide" NY Strip Steaks:
2 (12-14 oz) NY Strip Steaks
1 teaspoon grape seed oil , or vegetable oil
2 tablespoons butter, divided
handful of trimmed mushrooms
salt and freshly ground black pepper to taste
1 clove garlic
1/2 teaspoon balsamic vinegar
View the complete recipe
Tuesday, April 1, 2014
SAUSAGES… Appetizer or a Quick and easy Meal BANGALORE PEPPER SAUSAGES
The origin of meat processing is lost in antiquity but probably began when mankind learned that salt is an effective preservative. Sausage making evolved as an effort to economize and preserve meat that could not be consumed fresh at slaughter. Sausage makers use almost all parts of the animal carcass that cannot be used in other ways. The less tender cuts and organ meats are ground, spiced and made into delicious sausages.
There are lots of innovative ways that you could use sausages besides having them with your Toast and Eggs at Breakfast. You could slice / dice fried sausages and serve them on crackers with cheese as an appetizer. Dice them and add in salads, soups, curries, etc. Grill the sausages and eat with a creamy garlic dip. Use them in Casseroles and Bakes with other vegetables and meats or you could just make a very delicious curry dish with them as under.
RECIPE FOR BANGALORE PEPPER SAUSAGES
Ingredients
1 kg Ground pork (add a sufficient amount of small finely cut pieces of Fat to the mince)
2 pieces cinnamon about 1 inch each
4 cloves
1/2 teaspoon nutmeg powder
Salt to taste
2 teaspoons pepper corns
1 teaspoon garlic paste
2 tablespoon chopped coriander leaves (optional)
Sufficient quantity of casing for stuffing the sausages
Roughly powder the cinnamon, cloves and pepper. Mix all the ingredients together well and stuff into the casing. Grill or Fry when required. These sausages should be kept in the refrigerator and used up within 2 weeks as no preservatives have been used.
Monday, March 31, 2014
Venison with Juniper and Blackberry Honey Sauce


People often ask us for elk recipes. But elk and venison are very similar. You can pretty much interchange all our venison recipes for elk.
 |
| Juniper Berries |
Prep Time: 4 hours
Cooking Time: about 1 hour
Ingredients:
- 1 lb. venison tenderloin
- 3 tbs. corn oil
- 2 tbs. olive oil
- 1 tbs. juniper berries, crushed
- 1 small tomato, chopped
- 1 sprig of rosemary
- 1/4 cup of onion, finely chopped
- 2 tbs. of carrot, finely chopped
- 1/2 cup of red wine
- 2 cups of beef stock (or venison stock)
- 5 tbs. of honey
- 1 tbs. apple cider vinegar
- 1/2 cup of fresh blackberries
- sea salt, to taste


*Remember to remove all fat and silver skin from venison.


Just had to share this beautiful honey, which we got from a local bee charmer. :-)


