Showing posts with label roasted. Show all posts
Showing posts with label roasted. Show all posts
Tuesday, April 15, 2014
Paneer Fingers Tawa roasted Kids Lunch box recipes Indian
 |
| Kids Snack Paneer Fingers |
This is a ideal snack for toddlers and kids.
Serves- 4 Kids
Time required- 10 mins
Ingredients
Malai Paneer( cut into fingers)- 250 gms
Cornflour- 1 tbsp
Maida/ All purpose flour- 1 tbsp
Red chilli powder/ Pepper powder- 3/4 tsp
Salt to taste
Water- few tbsp
Olive Oil- few tbsp
Tomato ketchup to serve as dip
 |
| Tawa Paneer Fingers |
Method
Mix cornflour, maida, chilli powder, required salt and water to make a thin paste. Heat 1 tsp oil in a pan/ tawa, dip 5 to 6 paneer fingers into the prepared flour paste and place it on the hot pan. Cook the paneer fingers on both sides until browned and crisp. Spread some tomato ketchup on top of paneer fingers and serve.
Tips
Tofu( bean curd/ soy paneer) can be used instead of malai paneer.
Monday, March 24, 2014
Roasted Brussels Sprouts Medley with Refried Butter Beans Rice
 |
| Roasting Brussells sprouts brings out their inherent sweetness. |
Happy March! We made it through. The days are stretching inch by inch, noticeably longer. And just in the nick of time for this winter weary gluten-free goddess and her serotonin deprived little brain. Let's do a collective happy dance, Steve Martin style. We're sneaking up on a big turning point in the year. You know the one- when daylight equals darkness. The Spring Equinox will be here before you know it (March 20, 2009, to be exact). And then? You know what then. Luxurious long days, evening walks warmed by the sun. Sprouting going on everywhere you look. Buds bursting. A brand new season. Fresh. Life.
After the winter we've had- with all the Wall Street inspired doom and gloom infused with a shaken-not-stirred cocktail of fear and hope? I choose hope. This shouldn't surprise you. It's in my nature. New paradigms and inventive beginnings? Bring it on.
After the winter we've had- with all the Wall Street inspired doom and gloom infused with a shaken-not-stirred cocktail of fear and hope? I choose hope. This shouldn't surprise you. It's in my nature. New paradigms and inventive beginnings? Bring it on.
I love learning a new skill set.
So in the spirit of celebrating the whole sprouting and greening thing that is waiting for us right around the corner (if the wheel of the year could sport a corner, that is), the impending balance of the coming Vernal Equinox, I offer you a budget-friendly vegan meal that is fresh and earthy, green and nutty, savory and sweet. You know, that whole yin yang Real Food Daily approach to eating (how cool is Anne Gentry?). Food to feed you, body and soul, as the March winds blow and scatter the remnants of winter into memory.
I know some of you don't believe me when I tell you Brussels sprouts can be tender and sweet. You think these tiny cabbages are mushy and smelly and not worth consideration. To those of you in that particular camp, I must ask. Have you ever roasted Brussels sprouts? Because here's the thing. When you roast these little green babies they get all caramelized and nutty and they take on a whole new demeanor. And the best part? Roasting vegetables makes for an easy dinner. It's almost a night off from cooking. Well. Okay, maybe not a night off, but.
Pretty darn simple.
Sunday, March 16, 2014
Spatchcocked Roasted Chicken

Spatchcocked. I hate that word. Ive read a bunch of posts about this method of cooking and a lot of people said that they love this word and think its funny. For me its a mouthful and Id rather say butterflied. In essence its the same thing. The backbone is removed and the breast bone is broken so the chicken lays flat. This results in an even cooked, juicy and golden brown bird all over! No more flabby skin on the thighs!
There isnt an actual recipe for this and so Im going to write this post very casually. I made this recipe very simply and took a cue from another blog The Italian Dish. In addition I mixed 2 cloves of garlic with 2 tablespoons of melted butter, salt and some fresh thyme and rubbed it under the skin. I think this also helped the skin to crisp up and of course, added some flavor. I rubbed the outside of the bird with extra virgin olive oil, salt, pepper, fresh thyme, the juice of 1 lemon and the juice of one orange. I thought Id taste the citrus flavor more but I didnt. It was tasty but I couldnt pick out the citrus specifically. Maybe Ill up it a little next time. I roasted the chicken on a cookie sheet topped with a cooling rack at 400 degrees for about 50 minutes. There was a lot of delicious drippings on the bottom of the pan and I didnt want to waste them so I made a quick gravy to go along with it.


This was a great method for cooking a whole chicken. It was indeed crispy on the outside and moist on the inside. Ive seen that this can also be made on the outside grill! Cant wait to try that when the weather allows!

Wednesday, March 5, 2014
Roasted Bean Beet Salad with Blue Cheese
6 servings
1 hour 15 minutes - including 1 hour advance prep, but not cooling time

Roast the Beans and Beets
4 medium-large beets
450 grams (1 pound) green beans
1/4 cup mild vegetable oil
1 teaspoon sea salt
Preheat the oven to 400°F.
Peel the beets and cut them into wedges. Toss them with half the oil and salt in a shallow baking tray.
Wash and trim the beans and toss them with the remainder of the oil and salt in another shallow baking tray.
Roast both beets and beans for 40 minutes to an hour, stirring every 15 to 20 minutes, until cooked and showing signs of browning. Let cool until you are about to make the salad.
Make the Dressing:
1/4 cup sunflower seed oil
1/4 cup balsamic vinegar
1 tablespoon Dijon mustard
Whisk or shake together in a small bowl or jar.
Assemble the Salad:
1 small sweet onion (about 1 cup when chopped)
100 grams (1/4 pound) blue cheese, crumbled
Peel and chop the onion, and toss with the cooked, cooled beans and beets. Toss with the dressing and mix in the crumbled blue cheese.
Last year at this time I made Cauliflower with Tomatoes & Cilantro.
Read More..
1 hour 15 minutes - including 1 hour advance prep, but not cooling time
Roast the Beans and Beets
4 medium-large beets
450 grams (1 pound) green beans
1/4 cup mild vegetable oil
1 teaspoon sea salt
Preheat the oven to 400°F.
Peel the beets and cut them into wedges. Toss them with half the oil and salt in a shallow baking tray.
Wash and trim the beans and toss them with the remainder of the oil and salt in another shallow baking tray.
Roast both beets and beans for 40 minutes to an hour, stirring every 15 to 20 minutes, until cooked and showing signs of browning. Let cool until you are about to make the salad.
Make the Dressing:
1/4 cup sunflower seed oil
1/4 cup balsamic vinegar
1 tablespoon Dijon mustard
Whisk or shake together in a small bowl or jar.
Assemble the Salad:
1 small sweet onion (about 1 cup when chopped)
100 grams (1/4 pound) blue cheese, crumbled
Peel and chop the onion, and toss with the cooked, cooled beans and beets. Toss with the dressing and mix in the crumbled blue cheese.
Last year at this time I made Cauliflower with Tomatoes & Cilantro.
Monday, February 24, 2014
Linguine with Fire Roasted Marinara and Hot Italian Sausage

After I finished making the pizza on Monday night, I had some of the fire roasted tomato sauce as well as some brown hot italian sausage left over. I decided that I would combine the two, stick it in the refrigerator overnight and have it over pasta last night. Thats exactly what I did. I cooked some linguine, drained it and put it back in the pot with the rewarmed sausage and tomato sauce. Finished cooking the pasta for about 5 minutes in the sauce and served it with fresh grated parmesan cheese and a salad.
Tuesday, February 11, 2014
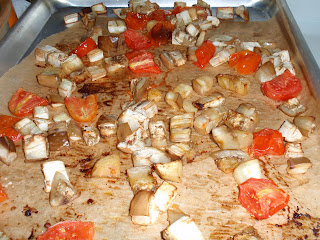
Pasta with Roasted Garlic and Eggplant Sauce

Pasta with Roasted Garlic and Eggplant Sauce
Ingredients:
2 eggplants, partially peeled (peel every other section so it looks striped), cut into large dice
4-5 tomatoes, cut into large dice
1 large vidalia onion, cut into large dice
1 head of garlic
Fresh basil
extra virgin olive oil
salt and pepper to taste
pecorino romano cheese, grated
Directions:
1. Preheat oven to 400 degrees.
2. Prepare 3 sheet pans with parchment paper (makes clean up a lot easier) and spread out eggplant and onion over 2 cookie sheets and put the tomatoes on the 3rd. Drizzle with extra virgin olive oil, salt and pepper and toss to coat.
 3. Slice top off of the head of garlic so garlic is exposed. Drizzle with oil, salt and pepper. Wrap well in foil and place in a small oven safe bowl or if you have space on your cookie sheet put it there. (Do not put it directly in oven as the oil make leak out and onto your oven.)
 4. Bake in the oven for 20 minutes and toss and flip so all sides get color. Cook veggies until soft and browned. Tomatoes may come out sooner than the eggplant. Check on the garlic - when a knife can easily pierce the garlic it is ready. The garlic can easily over cook and become burnt and hard. Check every 5 mins afterward if its not yet ready. Remove everything from the oven and allow to cool.
 5. Meanwhile bring a large pot of salted water to a boil. When garlic is cool enough to handle, squeeze out of the papery skin. It will come right out. When veggies have cooled down add them and garlic to a food processor (you may have to do this in batches and just add to a bowl to combine when its all blended). If its very thick drizzle in some oil while the food processor is on. Taste and adjust seasoning. Add torn basil.
 6. Cook pasta until al dente and reserve some pasta water. Return pasta to pot and toss in eggplant mixture. If it looks like its too thick add a little bit of the pasta water. Toss with romano cheese and enjoy!

Click here for a printable version of this recipe.
Tuesday, January 14, 2014
Classic Chicken Noodle Soup – Thank Goodness We Had Roasted Chicken Broth Around!

In case you haven’t been following along, let me catch you up. On Wednesday we made a gorgeous roasted chicken broth for the expressed purpose of making this soul-warming soup. Here, we used that wonderfully flavorful broth to complete the recipe, and let me tell you, it was incredible.
You know how much I hate to complicate a recipe, and Ill always err on the side of too few ingredients vs. too many, so when I make this chicken noodle soup it’s a constant battle to not add other “stuff.”
Not that’s there’s anything wrong with stuff, per se, but if properly made, this soup is just too amazing in its pure and natural state for any distracting, supercilious additions. By the way, a little advice to you young up-and-coming food bloggers; never use “per se,” and “supercilious” in the same sentence.
Yes, other than the mirepoix, and a tiny pinch of fresh thyme, the rest of this soup is basically chicken and noodles. Speaking of the noodles, I’m hoping you go with the wide ones I used. I was only half-kidding about this soup being a meditation, and egg noodle wrestling is half the fun.
Like I said in the video, this will work with regular chicken stock, but if you do decide to make this, I sincerely hope you go ahead and make the roasted chicken broth first. Enjoy!
Ingredients for 4-6 servings:
1 tbsp melted butter
1 tbsp rendered chicken fat
1 tbsp melted butter
1 tbsp rendered chicken fat
1/2 cup diced carrot
1/2 cup diced onion
1/2 cup diced celery
1/4 tsp fresh thyme leaves or pinch of dried thyme
2 quarts roasted chicken broth
1 pound cooked chicken breast, cubed
4 oz dry wide egg noodles
cayenne, salt and black pepper to taste
Subscribe to:
Posts (Atom)